1. How to create and set up a new label
Step 1: Go to My Space → LABELWISE → Labels.

Step 2: Click on the +New Label button.
Step 3: Fill in basic information about the label name.

Step 4: (Optional) Upload artwork in a supported format.
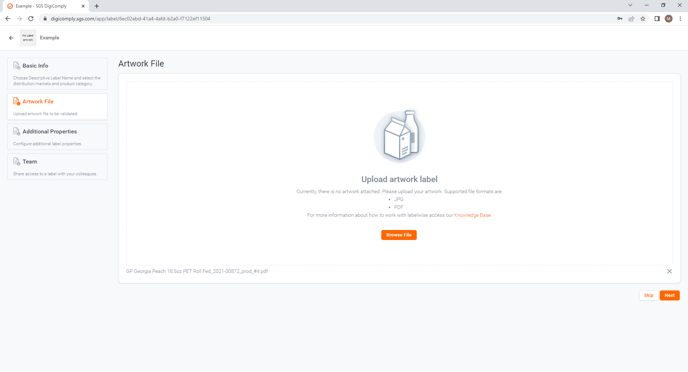
Optional steps can be done later. But immediately after you upload artwork, the system will start processing in the background. So by the time you complete the next steps, it's likely that your artwork will already be processed.
Step 5: Fill in label properties which are required (Market, Requested by, Category), you can fill in the rest of the information later
1. How to create a comment/task - OK2. (Good to Know) How to manage access to a label – OK
3. How to Update and Manage Label Status
The status you can check and change in the section “Validation feedback” in right site corner.

1. When the country starts the review the status of the work should be “IN REVIEW”

2. When the first reviewer from the country finished the review the status should be changed to “PROOFREADING”

3. After the both reviewers from the country finish the review, they should inform Managing Affiliate that the review is finished and changed the status for “PLAUSIBILITY CHECK”
4. Once the Managing Affiliates performed plausibility check, the review can be finished end the status should be changed for “DONE”. Changing the status for done means that the review is completed and the order is done.

Please note that before closing the order you received the below notification to confirm if it is correct to close the order.

5. How to create review report
This point is correct just please remove “(Info) Validation feedback(s) provided by a reviewer(s) will be grouped by markets (reaction flags) and used in the review report.” – under the last pic from this section
6. Review report
Food label review properties
The first part contains the same properties as used in the original SGS FOOD LABEL REVIEW template. These properties are automatically filled based on the properties* defined in the Label Information section. Also, the label preview is added automatically.* The only difference is the Overall Conclusion, which is generated based on the validation feedback(s)

Market-specific review
The next sections of the review report are market specific. Validation feedback(s) provided by the reviewer(s) are grouped by reaction flags (markets).
Each market-specific section contains:
- summary table
- text is generated based on the validation feedback(s) for a given market
- table with validations for specific elements
- legal requirements = label elements
- conformity = type of the validation feedback
- label detail = segment (selectable area) preview
- corrective action = text of the validation feedback
- comments/legislation ref. = regulatory requirements
- table for general comments
- this table is not filled automatically
- it is intended for other comments added by a user after the report is generated
- table with generic validations
- similar to the “table with validations for specific elements”
The difference is that this table contains validations that are not related to specific elements, but to element type (e.g. feedback related to all claims), or label in general (e.g. feedback related to label background).

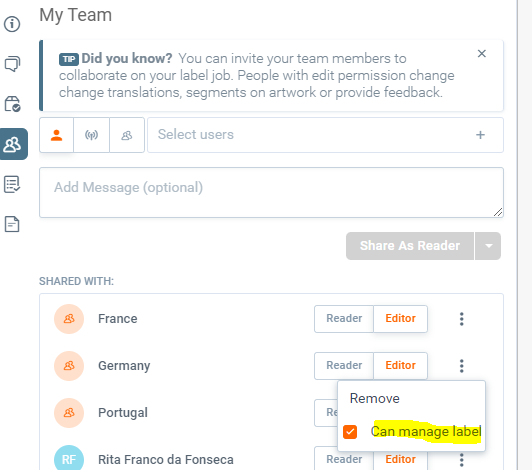
Step 6: (Optional) Share access to the label with your colleagues.

By default, only you as the creator of the label can access this label. If you want to give access to other team members, you can share this label. You can share as reader or editor.
It is also possible to give your own team access to the job. Select your own team, click on the three dots and checkmark “Can manage label”.
Step 7: Finish label creation by clicking on the Finish button.
- When the label is created, you will see it in the list of labels My Space → LABELWISE → Labels
- After creating and setting up the Label, it’s necessary to create the tasks for the reviewers, by doing the following, now allows you to instantly invite the reviewers to the Label meaning provide them access to the Label by assigning a task.
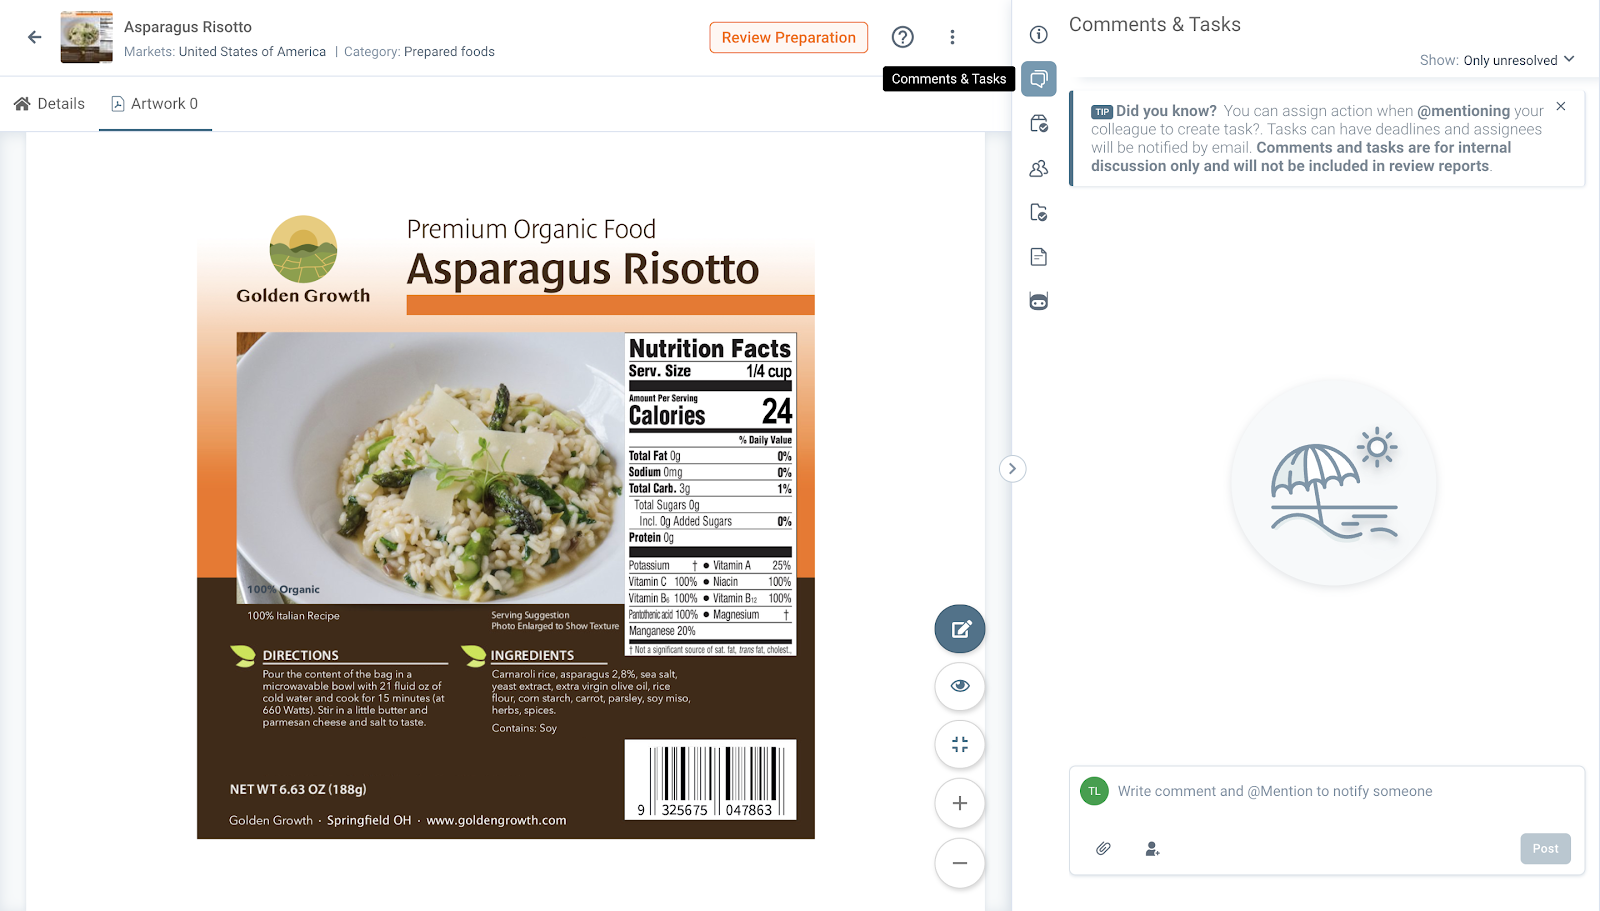
How to create a comment/task
- Go to the Label you’re working on.
- Click on Comments/Tasks.
- To write a Comment / Task mentioning or assign it to a team member, write the “@” sign before writing the name of the team or member you want to mention the Comment to or assign the Task to or press the silhouette icon and write down the name of your colleague or team.
(IMG Above) > Mention &/or assign team or members with the “@” sign.
(IMG Above) > Mention &/or assign team or members with the silhouette icon and plus button to “add more”.
- To ACTUALLY assign a Task to a team or member after mentioning it either with the “@” sign or through the silhouette icon, press the check box on the left side of the “Tag” with the name of your colleague, after that just click the POST button;
- (Optional) You can also add a deadline to the task you assign to your colleague by clicking on the calendar icon and selecting the date of the deadline in the calendar;


(IMG Above) > Click on the calendar Icon.
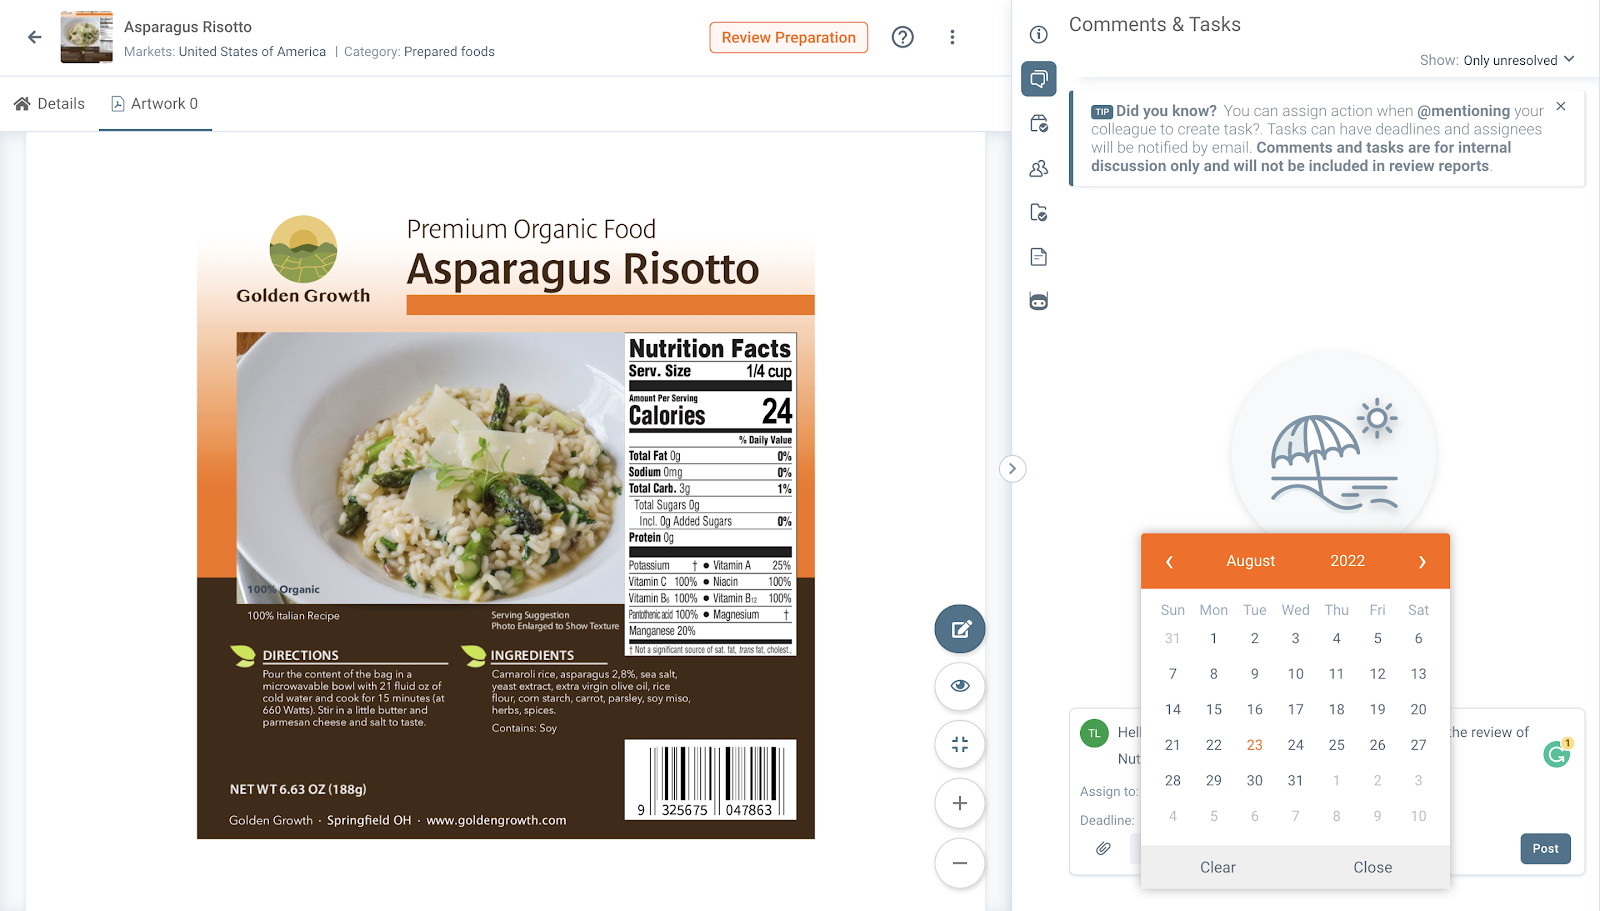
(IMG Above) > Select a date for the Deadline.

(IMG Above) > Post the Comment &/or Task.
- Info Mentioning a colleague or team in a Comment and Assigning a Task to a colleague or team is similar but not the same functionality. If you do want to assign a task to a colleague you have to click on the check box on the left side of your colleague’s name and that way the person will receive an email and in-app notification, saying you assigned a task to him/her/them. If you just want to mention your colleague in a specific comment, just add your colleague’s name (for example with the “@” sign), but don't “check”/click on the check box near the tag name. (See screenshots above).
Even though now in Labelwise we can instantly invite the reviewers to the Label by assigning a task, we can always check who has the access to the Label or even invite more reviewers if and when necessary through the following steps, although as mention before if you assigned a task and selected the option “Share Access with user” option there should be no mandatory need for these following steps.
How to manage access to a label
If you create a new label, only you as the creator of the label can access it. This label is not visible to other users. If you want your label to be accessible to other users for any reason, you need to share it. You can also control what can be done with your label - you can share as a reader or editor. Also in the future, you might want to change access rights to your label.
Possible use case: You want to ask your colleague for help with the validation of a label. So you share the label with him/her and after the work is done, you may want to remove access to the label.
Step 1: Open your label
Step 2: In the sidebar navigation panel, go to the My Team section.

Step 3: Select user(s), optionally add a message, and select how you want to share - as a reader, or as an editor.


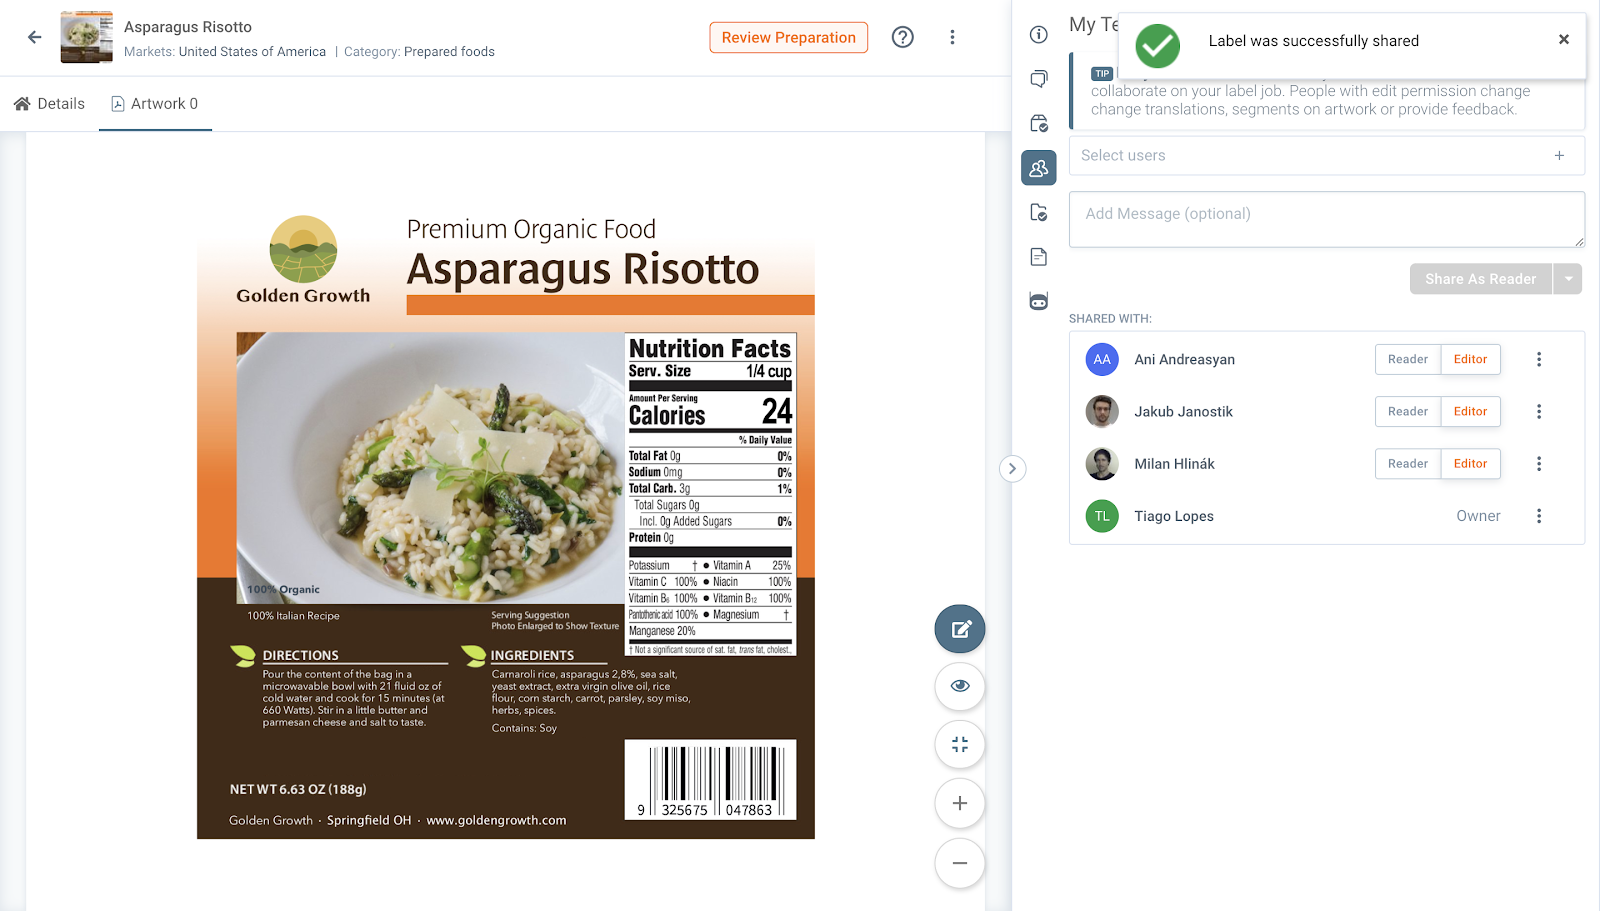
Step 4: After that, you will see users with whom the label is shared in the Shared with section. You can change access rights (reader, editor), or completely remove access to this label.

-
After you share a label with a user, the user will receive a notification (in SGS Digicomply) as well as an email.
Label access level control
Labels that are shared with you can be found in the My Space → LABELWISE → Labels → Assigned to me. A label can be shared as a reader or editor (see table below). If you want to remove access to your label for a user, you can simply unshare in the label page→ sidebar navigation menu → My Team → Shared with.
How to Update and Manage Label Status
Reviewers do the reviewing work, once finish the managing affiliate we can do the plausibility check.
How to create review report
-
Label Information properties are filled.
Info - Properties in the Label Information section will be used in the review report.

Label review (validation) process is complete (i.e. label reviewer(s) provided feedback(s)).

-
Info - Validation feedback(s) provided by a reviewer(s) will be grouped by markets (reaction flags) and used in the review report.
Label is in status Final Review.
Info - Review reports can be generated only if the label status is Final Review.
Label review reports can be generated in the Review Report section by clicking on the Create Report button. After that, the generation of the report starts. This usually takes several seconds. You will receive a notification in SGS Digicomply as well as an email notification when the report is ready. By clicking on the link in the notification (email), or after refreshing your screen you will see a new item in the list of review reports. Review reports can be downloaded by clicking on the item. This will download the review report in .docx format.
Review report
Food label review properties
The first part contains the same properties as used in the original SGS FOOD LABEL REVIEW template. These properties are automatically filled based on the properties* defined in the Label Information section. Also, the label preview is added automatically.
*The only difference is the Overall Conclusion, which is generated based on the validation feedback(s)

Market-specific review
The next sections of the review report are market specific. Validation feedback(s) provided by the reviewer(s) are grouped by reaction flags (markets). Each market-specific section contains:
- summary table
-
- text is generated based on the validation feedback(s) for a given market
- table with validations for specific elements
-
- legal requirements = label elements
-
- conformity = type of the validation feedback
-
- label detail = segment (selectable area) preview
-
- corrective action = text of the validation feedback
-
- comments/legislation ref. = regulatory requirements
- table for general comments
-
- this table is not filled automatically
-
- it is intended for other comments added by a user after the report is generated
- table with generic validations
-
- similar to the “table with validations for specific elements”
The difference is that this table contains validations that are not related to specific elements, but to element type (e.g. feedback related to all claims), or label in general (e.g. feedback related to label background).

- Info - Validation Feedback(s) without a reaction flag (market) are displayed under the “SUMMARY FOR OTHER” section.
Discover our new onboarding platform full of video guides - SGS Academy!